May 31, 2006

Steel beam is up

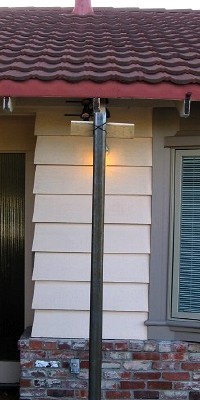
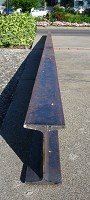
I found this contraption at Hertz Equipment Rentals. It's a material lift. This one is a Genie model SLC-12. It's the smallest they have, but a fair deal at $35 a day. It can hoist 600 pounds up to 12 feet -- more than enough for my beam.

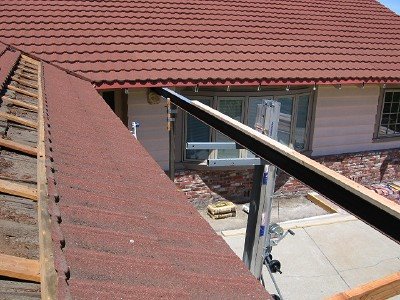
This operation took three guys (two at minimum I figure) -- one cranking the hoist and the others at the ends pushing it into position. The column tops were strapped with specially fitted wood blocks to collar the beam. A couple of 2x4 extenders were tacked from existing tail rafters to the nailer strip on the beam. It's stable for the time being unless there's an earthquake.

Next: getting a good welder to make some pretty welds.

May 30, 2006

Column welded to base!

In my attempt to blog more often and more on progress than results, yesterday I posted too quickly about not finding a freelance welder. Well it takes only patience. Last night a local guy called, we agreed to time and price, and this afternoon he showed up to do his 15 minutes -- the column is now welded to the base plate! Unfortunately for him, his weld was somewhat ugly, though still passable, so he spent extra time (about an hour total) grinding it down to a smooth concave fillet. I guess that's why he's looking for work. Paid him $75 still. It looks nice because he put in extra effort for pride. I later sprayed primer on it.

Now it's easier to prepare for the hoisting of the long beam. It's much safer without having somebody (like an hourly welder) waiting and watching. Tomorrow my assistant and a neighbor friend of mine will help me get that beam up there in slow motion.

May 29, 2006

Welding logistics

I was hoping to find a lowball freelance welder to do a tiny side job that would take 15 minutes at most. But the guy who showed up was totally unqualified. Regular mobile welders charge about $75 an hour with a two-hour minimum plus mileage. That's like $180 for 15 minutes -- does not make any sense. So now I have to modify my logistical strategy and have a welder come just once.

I'll have to rent a device to lift the beam, get my assistant available on the same day, have every component prepared in advance, then schedule the welder to come out at the same time.

The challenge is not only figuring a way to hoist the beam up in position, but to do so soon after the base is welded. Once the base is fixed, I can remove the bracing to cut the tail rafter making way for the beam. As shown in the photo, it's directly in line. The beam will be above the wall light, which will be removed, and stay about a half inch from the siding. Then it needs to be braced from getting pushed laterally because that will still be the weak direction.

See previous post.

May 28, 2006

Brown concrete

The only exposed concrete for this project is the bollard, which isn't really a true bollard. It just looks like one. Whereas an architectural bollard is a safety post to prevent vehicles from hitting a nearby structure (or to prevent vehicles from entering an area), here it's really just a column base.

So in becoming un-bollard-like, I've decided to try a brown colorant in the concrete to make it pretty. Bollards are otherwise bright yellow to attract attention. The steel will be wrapped, maybe with cedar, which is brownish, so hopefully the total assembly will look okay when finished.

Standing column

Concrete has been poured, the steel anchor plate has been embedded, and it's firm enough to work on. It's actually level enough that the column, having come from the shop with nicely square saw-cuts, can stand perfectly plumb. However, just to be safe I'm using a temporary 2x4 clamped to a nearby tail rafter for bracing while waiting for the welder. He'll have a tiny job welding it down, then come back to weld the column tops to the long beam once I have that in place.

But getting the long beam in place will be the biggest challenge of this project. It's a 25-foot, 310-pound I-beam. Hoisting it up there will take some ingenuity -- or brute strength. Then bracing it will be another trick. The columns, as strong as they are being embedded in concrete, can still get pushed over without the rafters tying them to the house.

One year Escallonia

I suppose the very wet recent winter helped to make these as big as they are now. Planted just about a year ago, these are supposed to be small or "compact."

Matsuda Compacta Escallonia

May 27, 2006

Centering the column

I used deck screws as shown to center the column in the bollard formwork. It should work. Whatever is used as a spacer stays embedded in the concrete, so choice of material matters. Anything thin or narrow is good because it allows easier passing of the wet concrete. It also has to be firm enough to stay in place during tamping or vibrating. The attachment point to formwork is where it will get exposed. I figure for my screws I could grind down the tips... then maybe dab some paint on it.

An interesting followup on the footing excavation -- there were no roots from the adjacent boxwood shrubs! Go figure! Now I'm confident I won't have to replace that boxwood.

May 25, 2006

Brick-side column base

The foundation system for this structure is basically a footing of 24-inches by 24-inches (at each column). There's also depth, but that's pretty much it.


At the brick side, the pour will level off at the formwork tops with the steel plate embedded to grab the concrete. Once cured, a steel column will be welded to the plate. This two-piece method is strong and easy; however, it only swaps fancy base-plate fabrication and anchor bolts with field welding, and field welding is a little more expensive. It's the better option here because the bollard side will determine the precise column location. So the brick side must then "float" -- the plate is large enough for final positioning of the column by as much as two inches in any X-Y direction. Field welding is needed anyway for the beam-to-column connection.

For height positioning I hope to set the plate at the precise elevation. Any excess height (column length) is best kept on the brick side because the simple column can be grinded shorter before erecting. The bollard side will be monolithic and set in place long before any welding starts.

May 24, 2006

Brick footing formwork

Trenches and formwork are done. It's ready for concrete. But first, of course, it needs to get signed off by a building inspector. This is such a small project (not even needing reinforcement bars) that the inspection should be super-quick. There's still some shoring to do for the steel column at the bollard side, so I'll do that while waiting for the inspector.


I've calculated the concrete to be 0.75 cubic yard. It's too much for bags but too little for a regular ready-mix truck. They typically require a minimum order of 3 cubic yards. Lucky for me, there's a building supply outlet not too far that sells towable ready-mix concrete in small quantities. All they require is that you have a vehicle equipped to tow. It should be a bucket trailer on a single-axle. It'll be interesting.

May 21, 2006

Front entry rendering

Here's the design intention for the porch roof and planter area at the front entry. The brick will be low at the planter area (two or three courses), then become an "L" garden wall at the post base. Hopefully I can later create a low café-style double gate to further add spatial transition going into the house.


The rendering shows a bright spot from the skylight. In reality it shouldn't be that bright. The green area is just a graphic indication of landscaping (shrubs), which, unfortunately, won't have automatic irrigation. I hope to find something drought resistant.

(continued from previous post)

May 20, 2006

A little footing trench

Yesterday it rained lightly. The forecast is for scattered showers through Monday. Hopefully that will be the last of the seasonal rains. Wet weather delays foundation work. Nevertheless, I had a couple of hours to kill this afternoon, so I got started on the shallow brick footing. Hopefully next day's showers will also be light and won't mess it up too much.


This is just a 5-inch-deep single-wythe footing along the front of the planter area. I'll hire a laborer for the deeper post footings later. Little foundations like this are always too small for skilled contractors and too exacting to leave to careless handymen. The house-side post base will be integrated with the garden wall, so it will be the first thing visible upon approach. Sloppiness here would just be glaring and obvious.

See my porch roof design post for general information.

May 18, 2006

Bollard formwork

The street-side post will have a concrete bollard as a base. It overlaps the shrubs a little, which is both good and bad. It's good if there's no damage to the shrubs during construction -- integration with existing landscaping will make it appear half-hidden as if it has always been there.

The bad is that digging just 24 inches down for the footing will undoubtedly sever some roots -- perhaps even killing the mature boxwood. If it gets too damaged, I'll have to dig up the entire area and replant a new one. Hopefully that won't happen.

Concrete looks only as good as the formwork in which they're poured, so I picked out a nice piece of 2x10 lumber with surface grain for the concrete side. The top edge is cut at a bevel. It's screwed together for easy removal. The inside corners has 45-degree moldings for a chamfered appearance. Since the top of the bollard will be troweled for slope, I've also angled the corners of the formwork to make it extra easy.


This will be a slide-down assembly during the pour with the column temporarily held in place. Click on the small image to see a PDF of the drawing.

May 17, 2006

Steel arrival

Not much to report today, except that the steel has arrived.

Since the design calls for an unusually long span, a wood beam was not possible. This is a narrow I-beam -- technically a S6x12.5. The columns are 3"x3" square tubes. They'll be wrapped or covered with wood. The photo may be misleading. It's a 25ft-long piece!

May 14, 2006

Porch roof design

This probably should be called an archway or gateway instead of a porch roof. It's hardly a porch. The intention is to create a better transition going in at the main entrance, which is a fundamental aspect of good architecture. Yet it's sadly missing in this house. Currently it's just an L-corner.

This final design, a long horizontal span in front of the garage, seems to be the best "bang for the buck" while staying with the building's original height, shape and mass.


Click on the rendered image to view a solar animation. You'll need the free Quicktime plug-in if you don't already have it. Also see previous post on concrete breaking.

May 13, 2006

Vines at 23 months


Planted nearly two years ago. They had a very wet second winter. The Lavendar lost a lot of leaves, but apparently they all come back strong! The Jasmine has reached full wall height and full coverage (far right). I've been trimming their tops. Two Bower vines are gone, having been attacked last summer by moles or gophers (blank spot on the left). This season is the first that any of them is flowering (the Lavendars).

Click on image to see how it looked when first planted.

May 12, 2006

Concrete breaking

There are at least three reasons to remove this section of concrete slab, and finally I've found the time and opportunity to do it.

1. New footing -- the new porch roof will need a new foundation footing. It must be a certain size and depth, and it cannot be built on top of existing ground slab because nobody knows how thick it is. The spot planned for it is visible in the photo foreground.

2. Planter area -- the column base will be integrated with a garden wall, which will be part of a planter area that I hope will soften the otherwise austere front facade. Right now there's too much concrete. I hope to start some evergreen shrubs that will reach the height of the window sill.

3. Sump pump pit -- at the low point of the driveway, underground currents push rainwater into the underfloor of the house. It's an odd situation, tricky to discover and potentially destructive. It's caused by the site's shallow hardpan and poor drainage. I've finally decided to address the problem head on with a good sump system that will redirect the flow to the side yard. The pit will be located where the worker stands in the photo.


Previous projects in same area: casement window at bedroom #2, bow window at office.

May 8, 2006

Sango kaku in Spring

Here's how the 'Sangu kaku' Acer Palmatum (Japanese Maple) looks now. The leaves actually return as early as March.


Compare to mid-February, when it was transplanted while dormant.

May 7, 2006

Carson myoporum

For my challenging soils, an "invasive" type tree seems okay. I have an isolated spot for it. This fills the last square hole in the south side yard. The nearest plant is the Tenuifolium. I must admit I'm curious what would happen after several years.

Note the stabilizing posts towards the rear, which is the only way I could fit it this time. As a result, I had to fabricate a fancy shelf-anchor for the rubber straps. Perhaps too pretty as tree staking? Oh well, that's me.


Myoporum laetum 'carsonii'
Carson Myoporum
a.k.a. Sandalwood


Rapid-growing, rounded, low canopy evergreen tree with dense, glossy, dark green, linear to ovate shaped leaves and thick, furrowed bark. USDA hardiness 9-10. Loam or sandy soil, full sun, maximum height of about 35 feet, can grow at a rate of 36 inches per season. Summer purple or white flowers. Fall purple or red small fruit (0.25-0.50 inch), which can be messy and is poisonous. Note: The species is classified as a most invasive pest plant by CalEPPC (California Exotic Pest Plants). Listed under category A-2; documented as aggressive invaders that displace natives and disrupt natural habitats. Habitats of concern are horticultural; coastal riparian areas in South Coast.

15-gallon size from Home Depot $45