
Bedroom #3 had an awkward closet location. Apparently the original designers did not take bed placement into consideration. The narrow dimension, from closet door to the opposite wall, was a mere 8'-9", which would leave only about 22 inches at the foot of a queen-size bed. A floor air register by the window was the other limiting factor.
So the best solution was to remove the closet entirely, squaring off the room, and annexing one of the adjacent room's closets. It helps that the adjacent room will get enlarged in the future to include plenty of new storage space.

Luckily, the rafters, ceiling joists and floor joists are all parallel to the demo walls, making this project one without structural impact — another reason to take out the walls.
Pieces of the removed gypsum wallboard were used for patching. It's the easiest way to keep the wall texture consistent.
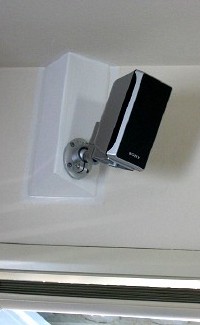
Electrical improvements include dimmable downlights, more power outlets, new phone outlet and in-wall speaker wiring, which, by the way, should be kept at least six inches away from the power lines to avoid audio interference.


 First I had to sell my old entertainment center. Cabinets like this will soon be totally obsolete -- the TV bay doesn't fit today's widescreens, and
  I got a flatpanel -- for versatility. They don't take up much space. Prices have dropped, too. The other high-end option was projector, but that would require considerable compromise to room decor for a screen and the projector location. A flatpanel is so hip.

 Precise elevation drops are important for proper water flow while maintaining maximum pipe coverage. Here, the outlet at the curb was already set at no more than half an inch above the outflow lip. It establishes where all upstream pipes must connect. Minimal intrusion into future landscaping was the objective, so the long straight run was kept at 1 percent slope. The shorter leg coming down to it is at 10 percent, which should provide plenty of flow momentum.
 I used two pieces of 1-meter trench drains (cemented together) cast into concrete, becoming a large inlet for rainwater that comes fast over the wide walkway. Establishing exact relative heights were important at every step during the installation. The step down and width of pour are essentially rise and run of stairs, so those minimum standards were considered. I kept the riser at four inches and gave the run a wide 13 inches.
 This one is amazing. They said because it's the variegated version I can't expect it to grow as fast. Looks pretty full compared to
  Growing tall and thin. Leaves are small compared to

 For purpose of controlling rainwater runoff, a curbed outflow landing made the most sense considering I wanted landscaping in this area. There's no municipal storm drain here. This is corrective measure after having removed a poorly designed concrete walkway that reduced useable back yard space.
 A wall niche is not for every taste. I think it's because to display small collectibles is to reveal a certain personality trait. Some people just aren't that way, while others love the idea. And the available styles are also purely aesthetic. There's nothing structural about these things.
 Finding the perfect spot for the niche was not as easy as it should be. Although this in-wall unit fits well within the bay between two standard studs, the wall where I wanted it had too many studs! The blue tape indicates their locations. It's a good idea to tape up a paper mockup to view at all angles before cutting. Height matters, too. Factory recommended fastening was construction adhesive, but because I had two tight studs on either side, face nailing was the better solution here. I also removed a mid-wall blocking.
 I finally got around to staining the new
 Then there's a gap that causes the latch to miss the catch. The sash has to be pressed outward to meet it. Packaging was also disappointing. It comes in a nice cardboard box, but inside the box was no protection against dents, making handling of the box misleadingly durable.


 Having two doorways into the same closet reminds me of a design strategy we sometimes use in homes for young families. Both doors would function as a nursery access. One of the rooms would be the parent's and the other a young child's, but while the child is still a baby and nursing, the access would be open and the closet not completely filled. Then as the child gets older, the door from the parent's side would stay closed while the closet is accessed only from the child's side. Often swing doors are used instead of bipass like what I have, but these two rooms can function in that way, too.
 Three studs were cut and removed. Well, actually two. I scavenged a whole piece for use as the new king stud on the left and inserted a new cripple piece above the header. I don't know why it looks grey. It's just the mid-wall blocking. The other two were cut at the top of header, then reused as trimmer studs (sometimes called "jack studs") to hold the same header, which is a 4x4 that I happen to have lying around. Without roof load, the header beam doesn't need to be any bigger than that. (Continued from
  Next will be careful measuring of where to cut along the studs. I want to minimize wall patching again on the other side (inside the closet), so I'll keep the top end of the studs as cripples to sit above a new header beam. The wallboard attached to it on the other side will remain intact -- hopefully. This is similar to the
  The nice thing about these recently built homes (this one is circa 1964) is the simplicity of construction. The "unfastened" wallboard simply swings out like a door (it could have also flipped downward or just flopped out). Debris was literally less than a handful, so the extra hour of nail pulling also pays off during cleanup. Eventually the unused pieces must be tossed, but overall it's still good condition sheetrock. (Continued from
  A strategic sawcut from floor to ceiling along a stud was helpful. The existing wall on the right will have its wallboard refastened to that stud, while new patch pieces on the left will also fasten to it. The wall corners above and to the left were knife-cut to break the taped seams. Needless to say, it's important to remove every nail before yanking on the wallboard, but a slight tug will reveal if there are any remaining fasteners. (Continued from
 Swapping
  Using scrap material (the studs from the
  And to reach the top of the window (purpose of the scaffold), I measured my comfort zone standing on the platform. I needed a 24-inch rise.
 Windows in a bedroom have to meet certain minimum egress requirements. The actual opening has to be a certain minimum area (currently 5.7 sq. ft. in my municipality), width (20 inches), height (24 inches), as well as some other requirements (not relevant here). Sill height must be low enough to the interior floor (44 inches). All these requirements affected my window replacement in
 Lots of little black bugs the size of fleas are infesting the tender growing tips of this Tenuifolium. They don't move. They seem to just hunker down to suck the juices of the new growth. Ants walk all over them like they're ground tiles. Scraping squishes them easily. Pesticide spraying gets them off for a day or two, but they quickly return. Tree seems okay, so I'll just leave it. Tree has grown a few inches since
  Although it wasn't a load-bearing wall, corner studs are still necessary for wallboard nailing at the edges of this closet wall. But the framers never had future removal in mind. They lapped them into the perpendicular studs with lots of face nails. I had to do some fancy cutting with a reciprocating saw and use a portable planer. This also left narrower than usual bays between studs for electrical boxes on either side of the wall.

 I've been making furniture. This one is rather interesting. I have a pedestal file that's about 5 1/2 inches lower than the desk. There's also an odd pointed corner at the desk. So I had a "design opportunity." Top piece is 1-inch acrylic slab. Rods are each 1 3/8 in diameter. Bottom is nominal 5/4 solid cherry. Acrylic to acrylic welds are the only permanent connections. The rods slide into holes in the cherry, which sits on the pedestal file sandwiching a non-slip pad. The entire assembly weighs 39 pounds.
 In the ground five months now.

 Just a paper shelf, really. Made from scraps. Can you tell it wasn't digitally planned with precision? The bottom shelf is 1/4 inch shorter than the rest. My mistake. I had the wood for it, too. Some dark endgrain (visible at the lower corners) is the dead giveaway. And the top shelf is too short. Oh well. It works.