Jun 24, 2006

Other end of beam

Gutters have been painted (two coats of matching brown color) and beam wrapping is almost complete. It's time-consuming because I have to wait for the stain sealer to dry before attaching. Notice the edge flashing (dark brown strip) by roofer that I must remove. It's not a proper edge drip. There's also an open hole at the lower corner.

This end of beam facing the street requires special attention. For one thing, it's weather-exposed. By code structural steel must be protected. Second, it's visible from all directions. It's the first thing you see upon approach. I'm using clear cedar to wrap it. Hopefully it'll add some "richness."

So far I've applied primer to all structural wood (near the edges), sealer to all cedar exposed or not and caulk to all seams. The pieces that wrap the end will be pre-glued as an air-tight assembly, then sealed with stain all around. It'll be fitted with plenty of caulk, then nailed with stainless steel nails.

Jun 20, 2006

To be removed

Other than this video (click on image to start), I'm not going to post any more stupid mistakes by the roofer. There are just too many to mention. The entire area will have to be torn off back to plywood deck. It's a given. This now is just for laughs.


Needless to say, there should be no air space under the torch-down membrane. It's not structural. This condition is caused by so many things -- wrong type of basesheet, not torching centers, inadequate nailing, sloppiness... The valley here, in fact, should not even have the bitumen! It's the seam where the new low-slope deck meets the existing metal tiles.

It will all be removed.

Jun 19, 2006

Roofer's mistake #3

When the roofer and I had discussed the critical spots that needed extra care, he correctly explained that the skylight curb corner where the existing valley flows toward it was one of the most important areas. He assured me that it would be wrapped up neatly, properly and perfectly.

But as chance would have it, the results are completely contrary to him claims. Indeed, there's a large gaping hole one-inch wide at exactly where it should NOT be -- the skylight curb corner below the valley -- inviting every drop of rainwater to flow into it!

When I first pointed it out, he assured me that it would "heal itself" in short time. Yeah right. It has now been four hot days, and the hole has actually lifted higher (due to improper basesheet nailing), exposing more void inside.

It's absurd.

Jun 18, 2006

Roofer's mistake #2

The edge of the bitumen should have been extended down to lap over the back of the gutter. Slow water flowing off of a low-pitch roof like this tends to find its way into open seams underneath due to capillary action. The roofer's work shown here is unacceptable.

Jun 17, 2006

Fired roofer!

Disappointing news.

I had to fire the roofing contractor today. He proved to know nothing about seaming torch-down bitumen to metal tiles. In fact, he proved to know little about roofing in general. He's actually just a handyman. I was duped. The increasing problems were scary.

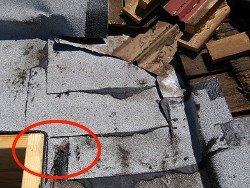
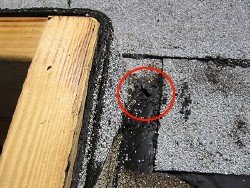
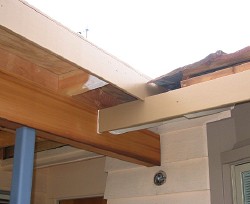
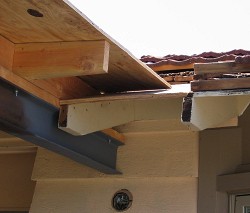
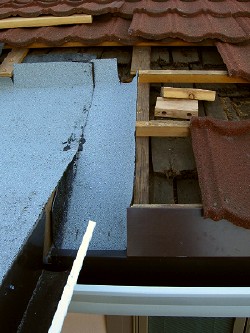
That bitumen piece he placed below the metal tile was his primary solution for rainwater flow! Not only was it missing the basesheet and flashing at the edges, but it would allow rainwater to flow UNDER the gutter! And still the metal tiles would have nothing to nail on while floating above it. This detail was the final straw. It was getting too ridiculous. He also had a contentious attitude when I questioned him on it and couldn't communicate his ideas. He wants to just do it and get it done. Wrong! This is my home!

I still paid him his full quote just to get rid of him. Better to eat it now and do it right. I removed all his silly "flashing" pieces (see previous post).

A genuine roofer who I had talked to months ago (on a different project) came by to look at it upon my asking. We noticed some more glaring mistakes and areas that were simply done wrong. I'll post photos tomorrow.

The best thing to do now is to tear it all off and start over. I am frustrated and disappointed.
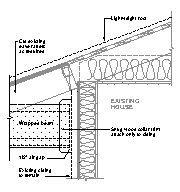
Jun 16, 2006

L-corner flashing


One nasty little detail is where the roof comes down to the intersection of the two gutters which are at different levels. Flashing is required, of course, but the shape of it is near impossible to create from a single piece. Here the roofing contractor stacked small pieces to create the transition. The white bitumen on the right is just an underlayment at this point because the metal tiles will sit above the highest flashing lip. Maybe tomorrow we'll remove it because it's not really doing anything.

The next challenge is to continue the transition to both the metal tiles AND the torch-down bitumen, with proper lapping depending on where each piece sits.

Torch-down bitumen


For low-slope roofs such as this, regular shingles are not allowed by code. Here I'm using torch-down modified bitumen. The black underside gets heated with a flame, then melts slightly and adheres to practically anything. There's a base sheet of roofing felt made specially for the application. It's in turn nailed to the plywood with basesheet fasteners -- short, ring-shank nails with large built-in plastic washers.

At where the existing valley comes down toward the skylight curb, it's especially tricky. The roofing contractor added extra layers of bitumen with the last one tucked underneath the existing flashing.

Needless to say, this seam is critically important. Rainwater that channels down the valley flashing should not sit in any kind of puddle, which is easy with a low pitch roof deck and nearby skylight curb. Then the top layer of metal tiles must be nailed to something and drip over everything. Hopefully that last step comes together okay.

Jun 15, 2006

Seamless gutters

Roof gutters have been installed. These are the seamless type that comes out of a special machine riding on a trailer. It bends a flat aluminum sheet fed from a roll and comes out perfectly straight to be sheared off at the exact length. They had white or dark brown (it can be flipped before feeding the machine).

The L-corner came together well, but took some fussing. I had to notch-cut the bottom of the 1x6 fascia board. The simplicity of their attachment was screws and brackets every four feet into the rafter tails (through my redwood fascia board). Ends were crimped, then sealant applied from the inside. They made good money for $390, which was the best price I could find within a few days.

Later I'll paint it the same light-brown to match.

Jun 14, 2006

L-corner fascia

With the steel beam wrapped (only partially as of today) and fascia boards up, the two horizontal lines for the roof gutter are now apparent. There's a vertical difference of five inches. Hopefully one gutter can flow into the other.

I've applied one coat of paint (over primer) for now because the gutter will reveal some fascia board below it, and the gap between the two might be visible. There's still a lot of corners and edges to caulk and paint.

Jun 10, 2006

Existing blocking


Instead of removing the existing blocking, I had cut around them to fit the new rafters. Everything was a nice snug fit. A gap resulted from the change in roof pitch. So for nailing purposes I filled the gap with angled pieces. Once glued, it's as good as a solid single piece. 10d nails also help to penetrate all the way through.

Jun 9, 2006

Flatwise blocking

Edge of plywood needs nailing, so I added these flat 2x4's as blocking fastened with Simpson A34's. They should be just right for the ring-shank 8d nails I've been using on the 5/8" plywood sheathing.

Steel beam has been brushed and sprayed with a coat of primer.

Jun 6, 2006

Skylight cutout

Why have a skylight in an outdoor porch roof?

Well, it's all about solar orientation and the needs of nearby rooms. I have an existing bedroom (possible future office or dining room) window just below it. The sun hardly shines in there, even with the previous short eaves. Now with the skylight, it's much brighter. Yet the deep roof shields midday sun nicely, providing a large protected walk-up area.

The framing stage at this point still allows changes. It can be closed off or cut larger. I think it's just right.

See solar animation.

L-corner false rafter

Underneath, the rafter tails tell a deceiving story. The closest one to the steel is a false member. It's actually just a nailing block for the plywood. One of the cut-offs was salvaged to mimic a regular rafter tail because the underside will be left exposed to match existing conditions.

The face-nail method right next to the steel was a tough decision. It means I would have to cut the cedar board around it, and it would look half-hidden. The only other choice was to nail to the cedar, which was logistically impossible because the cedar comes later.

L-corner plywood

This corner resulted from having multiple divergent constraints -- maximize headroom clearance under the beam (though minimized with the shortest possible beam profile), steepest roof pitch available, and closest match to existing gutter line without showing a gap or looking like a mistake. This photo shows it like a mess, but it came together well.

Jun 5, 2006

Sheathing installed

Plywood sheathing has been installed -- generally. There's still a lot of detail to button up at every seam, corner and edge before calling it complete and calling for the next inspection. I'll try to have the electrical ready at the same time, too. But the basic roof-to-beam connection has been achieved according to plan. It's the continuity of load from sheathing to rafters to top plate to steel beam that's structurally important. Both directions must be considered -- downward gravity force and upward lifting force (of wind).

I'll probably improve the cosmetics of the design by adding a fascia board and closing the soffit. Just minimum requirements are shown in the drawing.

Jun 4, 2006

End of beam

Where the steel beam meets the house, I didn't want to cut into the existing siding and introduce unnecessary moisture-control problems. There's no structural requirement to connect there. So the detail becomes a cosmetic one.

As such, a half-inch air gap is maintained for expansion-contraction or other movements, and later trim pieces will be attached to the siding to fit snug with the wrapped beam.

Jun 2, 2006

Rafters installed

Rafters have been installed. It's now taking the general form of the design. The current bright open airy feel, however nice it seems, is only temporary. It's not a trellis. The materials are not weather resistant, and the structure still needs the strength of plywood sheathing for rigidity. It'll be covered like a regular porch roof, but there will be a skylight near the door to brighten it back up.

Roof tear-off

Removal of the metal tiles reveals an older roof underneath. It's a wood shake roof in there and probably original to the house (1964). Some metal tiles show numbers that indicate they may have been manufactured in 1987 (in New Zealand), which puts their age at 19 years (or a little less, given the import and installation time). Or maybe the numbers don't mean a thing. But it's reasonable given the longevity of wood shakes.

The metal tiles typically have 50-year warranties if kept intact with the manufacturer's installation standards. Now the concern for me is how to blend it in with the new low-pitch roof because of the extra thickness.

Jun 1, 2006

Steel beam is welded

Long beam is now welded to the columns.

This guy was more proficient and had an assistant, but he still ran his grinder overtime. His machine is yet the same small type like the first guy's. I'm beginning to think that they have both underestimated the heft of ASTM A36 structural steel. The actual welding took no more than 30 minutes, but he was here for over two hours making it look good. I didn't tell him that it'll all be covered up with wood siding. At least maybe the building inspector will be impressed.

Penetration is always the question when it comes to welds. Once ground to a smooth concave fillet, the evidence is gone. It might as well be a surface weld -- it could look the same. But here it should be no problem because the structure was quite over-engineered. It's a very small, low, lightweight roof after all. In the past they would have just used wood. So the only hurdle here is to please the inspector.

For $160 he promised to fix it if it doesn't pass inspection. Wow.