Sep 29, 2006

Caulk and plinth

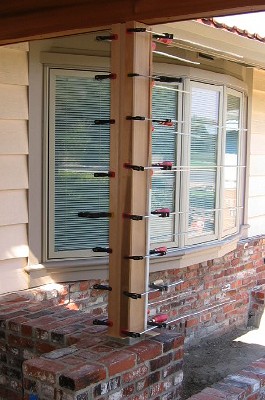
Brick-side post has been completed. Like the street-side version, I chamfered the corners. A careful bead of cedar-colored caulk at where it meets the beam will have to suffice in lieu of a traditional column capital.

At the bottom, however, something more was needed, especially given that the brick surface was perfectly horizontal and standing water could soak into the cedar. (Yeah I originally wanted to slope the brick top, but the bonus of having some counter-height space under roof cover was too tempting to pass up)

So I built a plinth out of mortar. The gap was caulked as usual. There always seem to be some shrinkage of the caulk. Later I'll apply a sealer to the brick and plinth.

Sep 26, 2006

Clamped post

I forgot to take a photo before clamping, but basically this is a biscuit-and-glue process. Same as before. Three sides were biscuit-and-glued in the shop, forming a U-shaped profile. Needless to say, precise cutting and shaping were essential because it had to fit snuggly. It totally helps to have a jointer and a good biscuit joiner, as well as the usual radial-arm saw (or table saw).

Before final assembly, I wrapped the steel with 1/16" thick packaging foam. It serves to buffer the two materials, steel and wood, because they will expand and contract at different rates due to various reasons. A snug fit sandwiching the compressible foam helps the cedar post to feel solid for a long time -- at least, that's what I'm hoping for.

Sep 24, 2006

False beam

In order to add more "enclosure" under the shed roof, I created this decorative beam (beige in the photo). Bottom edge is horizontal. This was not entirely preconceived in the drawings. I'm glad I found a way to fit it properly. Without it, the sloping rafters alone would define the new structure, appearing to extend straight to the outermost board, and that would make the addition seem less substantial. Having a beam at the corner also allows the ceiling material (on which I'm undecided at this point) to terminate at an inside corner.

Beam thickness was important, so I sandwiched three 1x redwoods to create a lightweight 2-inch board. It also hides a lot of holes and gaps at the existing corner. The underside of the roof overhang was then covered with 1x8 shiplap pine boards, which I don't want to use again. It bows too much when dried. Still need to touch up with brown paint, I notice.

Sep 19, 2006

Windmill Mole Chaser

To commemorate the death of two White Bower vines at the gnawing teeth of gophers (or moles or whatever they are), I planted this environmentally friendly device aptly called a Windmill Mole Chaser.

It's pretty much what it looks like, except there's a loose steel ball inside the horizontal metal tube, rolling and rattling while the ball-bearing windmill spins and rotates, helping to send extra vibrations to the ground, which is the concept behind it.

A standard 1/2" diameter 10-ft long galvanized iron pipe fits perfectly when set about 30 inches deep. I left mine totally untethered to allow the maximum conduction of "noise" into the ground.

It sells everywhere for about $20, but I got mine through eBay (new) for $8. Shipping and handling brought it back up to $19. Long pipe from Home Depot costs another $11.

Sep 18, 2006

Downspout

I had the option of NOT putting a downspout here because the gutter is open at the other end (at the L corner). It flows into the lower gutter which leads to a downspout at the far end. However, because of the significant tributary roof area from this side, I decided to take the hit in visual appearance and just be safe.

It's made from a standard 2"x3" smooth profile that comes in galvanized metal. A single piece was angle-spliced at the bends and riveted into shape. The important thing is to always lap the top section inside the lower cut. Flashing sealant was hardly necessary, but applied anyway. Metal primer helps. Only two fasteners were necessary at the post -- also riveted for a seamless finish.

Sep 16, 2006

Brick garden walls

When a landscape wall is nonstructural (as in not a retaining wall), it's generally called a "garden wall." This here is a garden wall. It happens to include a planter area, but even without it, it would still be called a garden wall. Most important is that garden walls need no special engineering.

Mine is primarily for appearance. It defines a space at the entry.

But because of the highly visible location, it was too intense for me to build myself. I've never built a brick wall before. It takes some special skill. So I did some search to find a mason. Again it's one of those small jobs too trivial for full-time masons yet too important to entrust to just any landscape handyman. Good thing I wasn't in a rush. I found a union-trained mason's apprentice who did a wonderful job. In two days I got this near-perfect project.

As usual, click on the image to see the previous post -- in this case, the original design rendering.

Sep 14, 2006

Cedar post

Street-side post has been wrapped with cedar. Previously I had referred to this as the "bollard," which still makes some sense -- it's protecting the shrubs from being run over by vehicles! Click on the image to see an earlier progress photo.

Sep 7, 2006

9-month Brisbane box

This tree is really shooting up there. I thought the dirt at this location was too poor, but apparently it thrives in most any soil as advertised. I've been watering it liberally once a week and trimming off a small lower branch each time, which hopefully signals it to grow upwards on top. Click on the image to see how it looked when first planted.

Lophostemon confertus