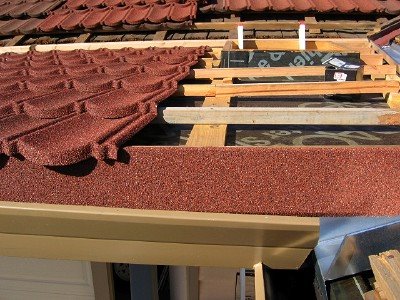
Thirty-three of the estimated forty-six pieces of new roof tiles have been installed, which may sound like "mostly done," but the trickiest pieces that need cutting and bending have yet to be started. These shown are just the full pieces over the large section of the new roof.
As briefly mentioned earlier, these are metal tiles. It's a unique proprietary roofing system by Decra. Very few roofing supply outlets carry it. I found some at the Burlingame branch of ABC Supply. Mine is the terra cotta style. They require 2x2 battens spaced 14.5" apart. I also got their fascia pieces (seen in photo foreground, covering the front edge).
Advantages of these tiles are:
- match existing roof (for me)
- looks like rich clay tile from a distance
- installation over existing requires no tear-off (if you're re-roofing)
- durability and a 50-year warranty when properly installed
Disadvantages are:
- easy to damage under foot (must walk ONLY on lip at 2x2's)
- labor intensive to modify when remodeling
- very few roofers truly know the product (some will always boast)
- challenging to flash at roof penetrations new or existing
- experienced professionals hate it for the above reasons
Jul 31, 2006
Jul 30, 2006
Summer lilacs
Just seven months in the ground and these are shooting up and outwards in all directions. I suppose that's why they're considered wild. I'm glad it's hiding that ugly wall repair by neighbor's handyman. Click on the image to see how they look when first planted.
Neighbor extended the fence with a lattice screen to get final approval for their newly installed swimming pool. Their solar post cap lamps are a nice touch.
Jul 28, 2006
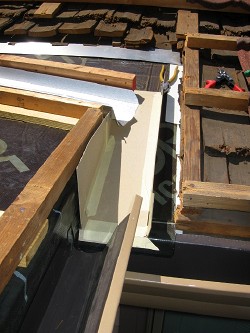
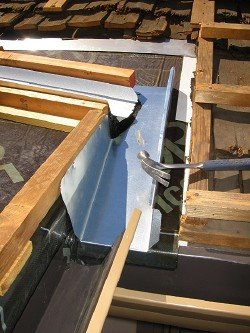
Custom metal trough
From the outlet of the shallow valley (where I've now installed a standard metal valley flashing because the whole area will have metal tiles), there's a sharp right turn to get into the gutter. It required a special piece of sheet metal.
The easiest and best way to make this custom trough was to mock up the final aggregate shape using cardboard and tape. The mockup only helps to show how and where the sheet metal should be cut and bent. I decided the best width was something that matches the nearby gutter. It'll line up the edge of the metal roof tiles with the front of the gutter.
With this piece finally fabricated and installed, my biggest worry is now behind me. Rainwater will flow over the metal tiles into the valley flashing, then into this trough, then into the gutter, with the Grace underlayment as secondary measure. The metal tiles on either side just needs to be bent over into the trough.
See earlier post showing how the incompetent roofer did it.
L-corner underlayment
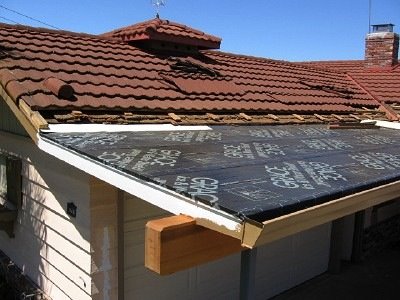
Earlier, after removing all of the roofer's sloppy work, including his stacked little pieces of sheet metal he considered "flashing" (see earlier post, L-corner flashing), I had installed Grace Ice & Water Shield throughout, which was built up by working at the lowest lip, lapping onto the gutters, then lapping higher with each piece until meeting the existing roof. There, it was lapped again with flat metal flashing, which was tucked under the existing roofing paper.
This type of underlayment wraps all potential corners and edges from leakage, and relies on having the gutter already in place. It's an excellent system for an odd corner like this.
Jul 26, 2006
Metal tile roof
Instead of bitumen, I've decided to continue with metal tiles throughout. It'll look better. These tiles are not supposed to be used at such a shallow pitch, but because the Grace underlayment is such a good waterproofing product, the tiles will be more decorative than actual protection. Here you see the 1x4 and 2x2 battens nailed down to establish the grid framework. Rainwater, if leaked through, will flow under the 2x2, then into the gutter.
Jul 16, 2006
Roof underlayment
Beam has been wrapped, caulked and sealed. Incompetent roofer's sloppy torch-down bitumen has been removed. Grace Ice & Water Shield has been applied. Flashing has been installed -- tucked under existing roofing felt under existing wood shakes, which took a tremendous effort and would have been skipped by most roofing contractors because it gets covered up by tiles that are supposed to shed all the water.
Subscribe to:
Posts (Atom)