Oct 31, 2006

Roof at entry 99% done

With only soffit painting left, the front project is 99% complete. Actually, there's also the cafe-style swing gate at the brick that I want to do, but that would have to come after the little concrete ramp that I also want to do, which must follow the front door replacement because of the sill condition, and it's now too late in the season to start another outdoors project.

It has taken me six months. Total cost, not counting the surveillance system or the payout loss to the fake roofer, but including all permits, material, labor, new tools, and the planter area, is nearly $8,000. In complexity and effort, it has exceeded my ceiling project of three years ago (but not counting the bow window or the office furniture in that one).

Compare photo above to my original design drawing (animation).

Oct 30, 2006

Surveillance camera

Because of the floor plan configuration here, a surveillance camera at the entry becomes helpful if not absolutely necessary. The walk-up at the front is just not visible from the kitchen/ dining/ family area. As such, electronic gadgetry will have to make up for it.
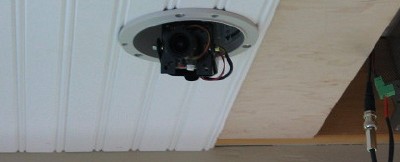
Some factors to consider when choosing a camera:

Wired or wireless
I chose hardwired despite the extra effort because it's generally a clearer signal and there's no risk of interception.

Day or night
It comes down to your purpose. If it's for security, there's IR (infrared), which varies in brightness and quality with the number of LEDs built around the lens. Mine is considered "day/night" -- it's color, has no LEDs, but turns B&W and sensitive to 0.03 Lux illumination. Most color-only versions need a minimum of 0.5 Lux.

Imaging element, resolution, pixels
The larger, the better. Mine is a 1/3" hi-res super HAD color CCD, whatever that means. It produces 480 TV lines, which is high, but not as high as some of the top end units producing 530 or more. My effective pixels are 768x494 -- should be adequate for a small TV.

Lens
Most have fixed lens and a pretty wide angle, but often it's hard to tell how wide an area or how close up you need until after you mount it. There's an online calculator that helped me decide on getting this unit with a variable 4mm-12mm lens. My adjustments are about halfway.

Cable, connectors, power
Whereas bundled kits use special connectors (like S-video, which is near impossible to make yourself), the universal or older system uses BNC or RCA connectors on coaxial cable. Power requirements are mostly 12V or 24V. Some units don't come with a power convertor because installations can be multiple cameras fed by a central multiple-output supply.

Form factor
Some features are available only in certain forms, like boxy with long interchangeable lens. Others, like hidden pinhole with motion detection, have limited features. I wanted a dome type first -- the features available happen to be sufficient. Vandal-proof versions are just those with special screws. Weatherproof ones have rubber gaskets.

PZT
Mine is not PZT, but PZTs are remotely controllable in panning, zooming and tilting. They're motorized and very expensive. Their cabling and controller requirements put them in a special category.

Monitoring or recording
At the receiving end of the video signal, there's another slew of choices. There's computerized, which is software + Windows-based machine + interface card. Almost anything is possible with the right software. Then there's traditional separate devices. For separate devices, the newer systems are all digital, while analog is simply going direct to a TV, which is what I'm doing. I had considered a pricey VGA adapter with cheap LCD computer monitor, but the single use didn't justify it. Nor the potential burn-in worth it. Switching, recording and networking are other options requiring more equipment. Some even have their own IP addresses built around a wireless camera -- but they have their limitations.

Vitek VTD-VPH412DN $235

Oct 29, 2006

Covering the soffit

Ceiling (or soffit) at the entry roof is now about half done. I'm installing a T&G (tongue and groove) wainscoting material that comes 8" wide, 8' long, 1/4" thick, so it's lightweight enough to staple up (pneumatic-driven, 18 gauge, 1/4" crown, 3/4" long). There's plenty of expansion and contraction because it's not exactly exterior-grade material. I'm rabbeting the end joints to handle the movements. Hopefully adhesive caulk and paint will seal it.

At the far corner is an opportunity to install a surveillance camera. I've already installed siamese RG-59 cable in the attic, routed to a central location. DC power will be fed from a distance, while the video signal will be available for distribution throughout the house.

Oct 26, 2006

Cheesewood not growing

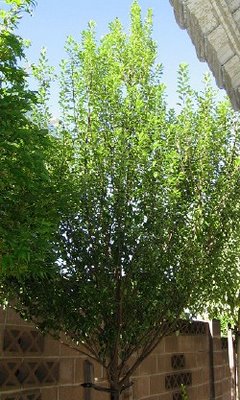
Still same size (trunk diameter, height, spread, appearance) as when first planted over four years ago! Click on image to see prior update.


Pittosporum Undulatum or Victorian Box or Cheesewood.

Oct 25, 2006

2nd year Lemonwood

Pittosporum Tarata -- supposed to be a densely foliated evergreen.

Problem is, mine has dropped a lot of leaves. So right now it's not so densely foliated. Branch tips are mostly healthy still. Some, however, look pretty weird with their inner leaves missing. Photos don't show it.

It's a tough location. Soil is clay, and nearby young shrubs need water. Four feet away seems not far enough. So while last summer it thrived at roughly five gallons every two weeks, now it appears drowning without a drop spilled on it for over two months. It's probably getting weekly water from the shrubs, which isn't that much either. With hard-packed clay, underground moisture probably gets trapped in the softer soil.

At least, that's what I think -- that it's too wet and not getting enough nitrogen. I'm not sure though. The Tenuifolium showed similar symptoms but came back only AFTER I watered regularly!

For sake of this tree, I might have to parch the entire area. Maybe replace the shrubs with succulents. I don't know. At least, I'll have to be extremely careful about giving them just enough water. It's elusive though. The underground conditions are difficult to assess.

The lesson here is probably to make sure drainage is good for all future plants -- shrubs as well as trees -- or engineer for it, like laying down a drain pipe.

Oct 24, 2006

2nd year Photinia (tree)

All is well for this tree. It still takes a lot of water each week. Apparently it drains well at this location. This tree also tells you quickly if it wants water -- new growth is reddish and don't show up if dry for more than two weeks.

The surprising thing is that its trunk size is still small compared to the others planted same time same size. Just the species I hope.

Photinia fraseri

Oct 22, 2006

Garden at front entry

From upper left to bottom right:


Firebird Canna
Recommended by others, this stalkish, large-leaf perennial with a bright flower on top adds some natural dimension to the otherwise austere rectilinear brick box. It's also interesting to have the flower and nothing but the flower visible from inside the room -- and from the front entry over the side wall.

Canna x generalis 'Firebird'
Dwarf Red Canna Lily
Semi-evergreen tuberous rooted perennial. Tall, clumping growth to 2-4 feet in height; forms a large clump with time. Large clusters of very showy, fiery crimson to red-orange flowers in summer. Large, rich green foliage. Plant in full sun. Water regularly through the growing season. Remove individual flowers as they fade. Cut stalks to the ground after bloom. Foliage is good in cut flower arrangements. Good container plant.
From East Bay Nursery, $24.95 pot size #2.


White Trailing Lantana
I got it for the white flowers, but studied it more only after planting 60 of them. If it "trails" forward into the driveway I'll just have to cut it back. The best thing is that it won't reach the underside of the bow window. I'm told it's very easy to grow. That's important for me.

Lantana montevidensis
A flowering perennial; can reach 12-15" tall with a 3-6 foot spread, making it a nice groundcover. The blooms are pure white and appear in masses from spring to fall, and are great for attracting butterflies. In warmer areas White Trailing Lantana is an evergreen and the foliage will change to a red-purple color in the colder months. The foliage is very aromatic and can irritate the skin of some people. Tough, resilient plant that thrive in hot weather and bloom profusely from spring until frost. Hardy lantanas will typically show no growth in the spring until soil and air temperatures are quite warm. Prune lantana periodically during summer by lightly shearing the tip growth to encourage repeat blooming.
From Home Depot, $2.36 per six-pack.


Tasman Flax Lily
Its grass-like verticality will hopefully contrast nicely with the horizontal facade. I wouldn't mind if it grew taller than the brick veneer background. This plant was the whitest green I could find -- important to stand out from the red brick, I think. And blue flowers! Red, white and blue flowers... whaddaya know.

Dianella tasmanica 'Variegata'
Variegated Dianella
An evergreen perennial. Mounded to upright growth to 3 feet in height with an equal spread. Grass-like category; Phormium family; Australia origin. Loosely branched clusters of dark blue flowers bloom through the summer and are followed by bright blue berries. Very long, thin, bright green leaves with thick white margins grow to 2-3 feet in length. Plant in full sun to light shade on coast, shade inland. Tolerates most any soil. Best with regular water; does well with little summer water when established. Dig and divide clump every second or third year to rejuvenate growth; fertilize lightly in spring. Hardy to about 20-25 degrees F.
From East Bay Nursery, $15.95 in pot size #1.

Oct 17, 2006

Planter area ready


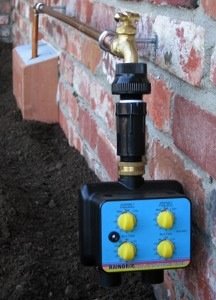
Measuring about eleven feet wide and four feet out, the brick-curbed planter area is now ready for planting. The foundation vent has been fenced off with a bottomless redwood box capped with a sloping metal screen. The battery-powered inline twin timer is a Raindrip -- quite the BMW of irrigation timers. It's compact, feels rugged, has easy-to-read dials, and the battery cap is conveniently located on top.

Orange flags indicate possibly five shrubs, while the row of white stubs indicate possibly a row of perennial flowers.

Oct 15, 2006

Alternate idea (hose bibb)

The other way of attaching pipe to brick is by nailing to wood that's anchored with Tapcons. It would have been much more visible, so I played with a design for a "hose bibb screen" -- slender horizontal slats of redwood that would even hide the bulky timer unit. It would've had to protrude nearly 7 inches off the brick!

It looks way too ugly for such a tiny planter area, and especially in such a central location in front of the house.

Glad I didn't do it.

New hose bibb

I decided to bring automatic water to the small planter area because of its "landlocked" location isolated from natural rainfall. Lucky for me, there's the existing foundation vent through which a 1/2" copper pipe can route straight to an existing water line. There was just one hole to drill in a wood blocking underfloor. This was kept as simple as possible -- the system consists of two 90° elbows terminating at a standard hose bibb. I'll then attach an inline battery-powered timer for soaker hoses.

That gaping hole is from accidentally chipping off a brick while studying the width of the vent slots. The brick is just nonstructural veneer. There's an inside screen, but I'll probably insert a thin brick back in place, which may look funny. The vent will be fenced off from soil anyway.

Attachment of pipe to brick was achieved with 1/4" x 5" eyehooks epoxied into drilled holes. The outside diameter of the pipe, being 5/8", fits perfectly through the eyehooks. The resulting 3" standoff from the brick also gives the timer unit enough clearance to connect, since, to save space, I didn't want to turn the hose bibb outward.

Oct 13, 2006

5 month Sandalwood

A.K.A. Carson Myoporum, this tree looks amazing strong and grows incredibly fast. I should have measured the trunk size when planted five months ago. Now at 2.30 inches diameter three feet above ground (2.39 inches thick at one foot above ground), I think it has gained weight just over the first summer! Click on image to see why.

Oct 12, 2006

Dirt hauling

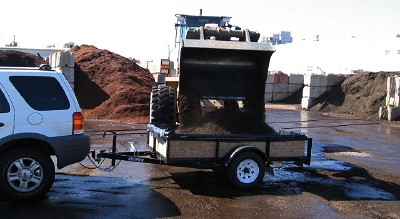
Today was dirt hauling day to fill the planter area.

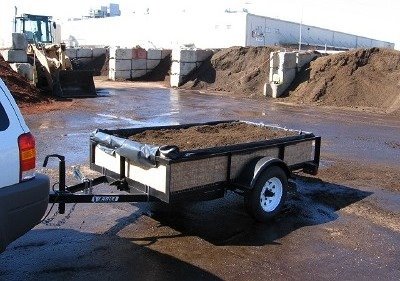
My calculations indicated I needed 1 cubic yard of soil. American Soil in Richmond sells a high quality "general landscape" for $35/cu.yd. (also $5.25 per 2cu.ft. bag). My trailer has a capacity of 1.4 cu.yd. if filled to the brim of its 15 inch fence; however, that's beyond its listed axle capacity because the soil weighs 1,500 pounds per cu.yd.

What I discovered was that the bucket size of the front loader carries a bit more than 1 cubic yard, so ordering 1 results in close to 1.3! Even more so if you're friendly with the guy at the yard. I think while coming back on the freeway I heard the axle buckling. Then when I got back and shoveled it all in, I still had a wheelbarrow-ful left over!

Today was all pushing the limits.

Oct 11, 2006

2nd year Tenuifolium

This one lost plenty of leaves in early summer until I continued hand watering regularly. It had, however, grown much taller before then. I'm still unsure if it's happy or not. The leaves that dropped were from the bottom and inside, while the tips continued to thrive. I thought that indicates drowning in soil too wet. Apparently not.

Pittosporum Tenuifolium

Oct 10, 2006

2nd year Strawberry

Also planted two years ago. And like the Lemonwood variegated, it still requires weekly water. It tells you quickly (after about a week) with drooping leaves.

Doesn't really litter, but small soft flower bells (I don't know what they're really called) fall off regularly. Click on photo to see previous update.

Arbutus Marina

Oct 9, 2006

2nd year Lemonwood var.

Just about two years in the ground. Click on the image to see previous update.

Pittosporum tarata variegated

Oct 5, 2006

Skylight well

Roughly fourteen inches deep (vertically), the skylight well now looks much more effective lined with smooth white material. It's just the primer coat for now, but later I'll paint it white just the same.

Oct 3, 2006

Rafter ventilation

Contrary to what I thought earlier, ventilation is required to framing regardless of insulation. I was planning on providing it anyway. But now to provide it in spades, I've drilled holes in the existing blocking and same in the blocking above the new beam. Now the ceiling can be covered without gaps, and the rafter bays will still get cross ventilation from eave to garage attic. Lucky I made all those screened slots in the eaves even though I thought it was unnecessary!

Photo also shows blue ceiling boxes and the false beam at far end.

Oct 2, 2006

Beam to siding

Rough electrical and junction box are done.

Electrical system is nothing but three ceiling boxes and a recessed can light stringed together with 14/2 Romex wiring. Power comes from the existing electrical box at old wall sconce. (Photo links to earlier photos as usual.) I just had to wrap it nicely with cedar. The alignment to beam was no accident. The existing wall light actually defined, in part, the total width of the whole structure!

Light brown cover plate was supposed to be cedar, but it became too challenging to fabricate because it had to be thin to accommodate screws. Maybe later I'll replace it... if I can find cedar that thin that wide.

Update: double-layer cedar cover now has a light sensor. Click on photo to go to blog entry.