Jun 24, 2006

Other end of beam

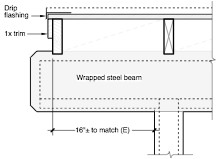
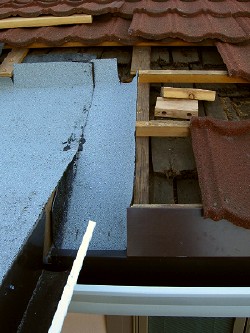
Gutters have been painted (two coats of matching brown color) and beam wrapping is almost complete. It's time-consuming because I have to wait for the stain sealer to dry before attaching. Notice the edge flashing (dark brown strip) by roofer that I must remove. It's not a proper edge drip. There's also an open hole at the lower corner.

This end of beam facing the street requires special attention. For one thing, it's weather-exposed. By code structural steel must be protected. Second, it's visible from all directions. It's the first thing you see upon approach. I'm using clear cedar to wrap it. Hopefully it'll add some "richness."

So far I've applied primer to all structural wood (near the edges), sealer to all cedar exposed or not and caulk to all seams. The pieces that wrap the end will be pre-glued as an air-tight assembly, then sealed with stain all around. It'll be fitted with plenty of caulk, then nailed with stainless steel nails.

Jun 20, 2006

To be removed

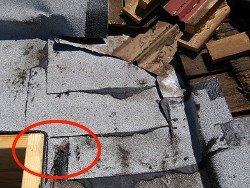
Other than this video (click on image to start), I'm not going to post any more stupid mistakes by the roofer. There are just too many to mention. The entire area will have to be torn off back to plywood deck. It's a given. This now is just for laughs.


Needless to say, there should be no air space under the torch-down membrane. It's not structural. This condition is caused by so many things -- wrong type of basesheet, not torching centers, inadequate nailing, sloppiness... The valley here, in fact, should not even have the bitumen! It's the seam where the new low-slope deck meets the existing metal tiles.

It will all be removed.

Jun 19, 2006

Roofer's mistake #3

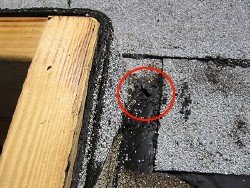
When the roofer and I had discussed the critical spots that needed extra care, he correctly explained that the skylight curb corner where the existing valley flows toward it was one of the most important areas. He assured me that it would be wrapped up neatly, properly and perfectly.

But as chance would have it, the results are completely contrary to him claims. Indeed, there's a large gaping hole one-inch wide at exactly where it should NOT be -- the skylight curb corner below the valley -- inviting every drop of rainwater to flow into it!

When I first pointed it out, he assured me that it would "heal itself" in short time. Yeah right. It has now been four hot days, and the hole has actually lifted higher (due to improper basesheet nailing), exposing more void inside.

It's absurd.

Jun 18, 2006

Roofer's mistake #2

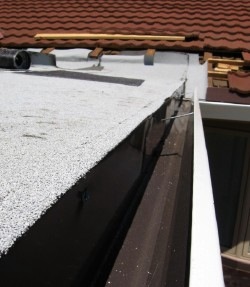
The edge of the bitumen should have been extended down to lap over the back of the gutter. Slow water flowing off of a low-pitch roof like this tends to find its way into open seams underneath due to capillary action. The roofer's work shown here is unacceptable.

Jun 17, 2006

Fired roofer!

Disappointing news.

I had to fire the roofing contractor today. He proved to know nothing about seaming torch-down bitumen to metal tiles. In fact, he proved to know little about roofing in general. He's actually just a handyman. I was duped. The increasing problems were scary.

That bitumen piece he placed below the metal tile was his primary solution for rainwater flow! Not only was it missing the basesheet and flashing at the edges, but it would allow rainwater to flow UNDER the gutter! And still the metal tiles would have nothing to nail on while floating above it. This detail was the final straw. It was getting too ridiculous. He also had a contentious attitude when I questioned him on it and couldn't communicate his ideas. He wants to just do it and get it done. Wrong! This is my home!

I still paid him his full quote just to get rid of him. Better to eat it now and do it right. I removed all his silly "flashing" pieces (see previous post).

A genuine roofer who I had talked to months ago (on a different project) came by to look at it upon my asking. We noticed some more glaring mistakes and areas that were simply done wrong. I'll post photos tomorrow.

The best thing to do now is to tear it all off and start over. I am frustrated and disappointed.